
How Desk & Park works
A complete guide to booking desks and parking spaces, checking in with a QR code and managing the office — for employees, executive assistants, Board Members, managers and administrators.
What is Desk & Park
Desk & Park is a platform for booking desks and parking spaces in a hybrid office. Everything happens on an interactive map — you pick a free space, book it for a chosen day and check in on-site with a QR code. The app runs in the browser and on your phone, with no installation. What you see depends on your role.
Roles and permissions
Employee
Books desks and parking, checks in and manages their own reservations.
Executive Assistant
Books like an employee, without the one-desk and one-parking-spot-a-day limit, and can book seats for guests from outside the company.
Board Member
Has a permanent space. Can release it for a given day and review Board Reports.
Manager
Enterprise plan onlyAn employee who also reads Team Reports — the board reports narrowed to the departments and teams the administrator assigns. Can hold a permanent space.
Administrator
Configures locations, maps and spaces, and sees full analytics.
Admin
Signing in
- 1
Open your company address
Enter the app address in a browser on your computer or phone.
- 2
Sign in with your work e-mail
Enter your organization identifier and work e-mail. The first time, pick the e-mail code — the invitation needs no password. You can then set one in Settings → Security: 12 to 256 characters with an upper-case letter, a lower-case letter, a digit and a special character.
- 3
Confirm the 2FA code
Once you turn on two-factor authentication in Settings → Security, every sign-in asks for the code from your authenticator app — after a password, an e-mail code, or a passkey used without a PIN or fingerprint. A one-time recovery code works too.
Add to your home screen
Single sign-on is for employees, not administrators
Everyday use
The three things you do most often: book a desk, book parking, and check in on-site.
Booking a desk
- 1
Go to reservations
From the left menu, choose
Reservations/ the office map. - 2
Pick a day
Set the date you want a space for. Today is the default.
- 3
Click a free desk
On the map, green dots are free, red ones are taken.
- 4
Confirm the booking
Check the space code (e.g.
D-12) and the hours, then confirm.
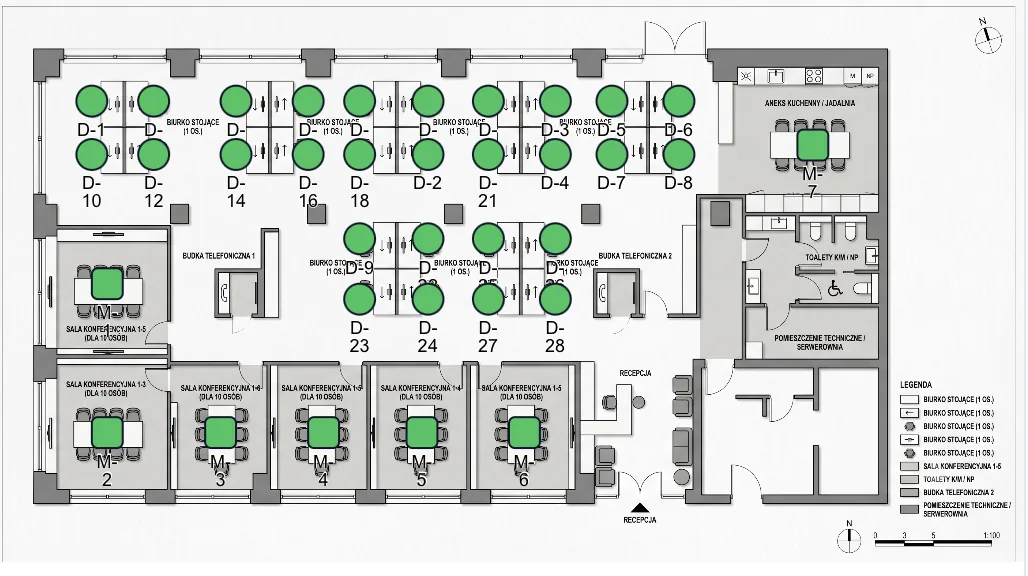
Two taps from the dashboard
Booking parking
Works just like a desk, only on the parking map. Spaces have codes P-1, P-2… and spots with an EV charger are additionally marked.
EV chargers
Who is in the office
On the Dashboard, right under Your day, one panel answers "who is coming in that day — and where?". Pick a day and a floor: every booked desk carries its person — photo or initials ringed in the team’s colour, with a green dot once they check in — and the roster beside the map lists the same people grouped by team. The Desks | Parking toggle swaps the floor plan for the parking map, so “who is parking today” gets the same answer — EV chargers and Board-Member spots included. The toggle appears when your organization has both kinds of maps; a parking-only setup opens straight on the parking view. Clicking a person highlights their space on the map, and tapping a pin highlights the person on the list.
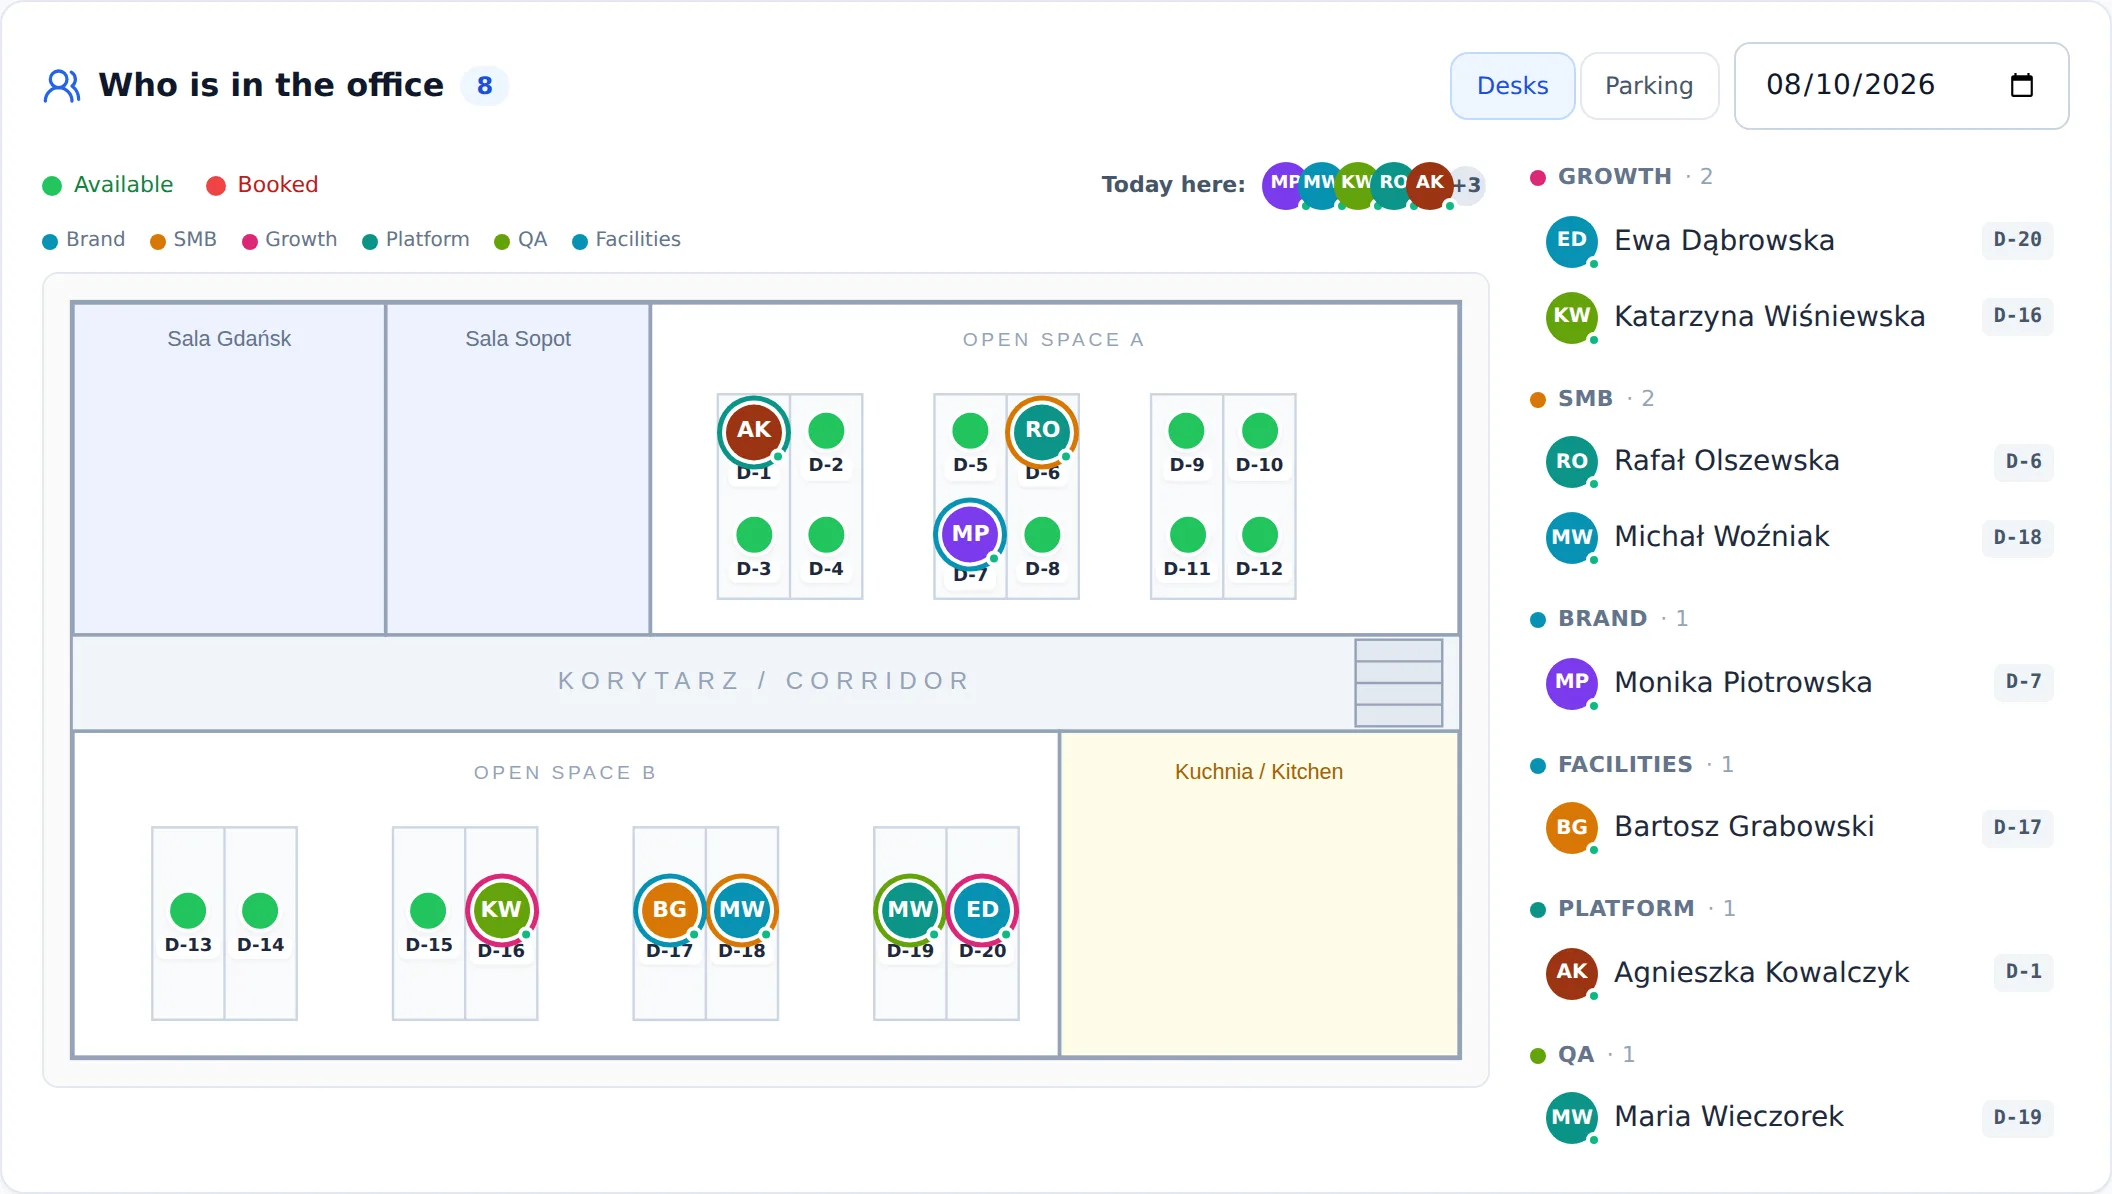
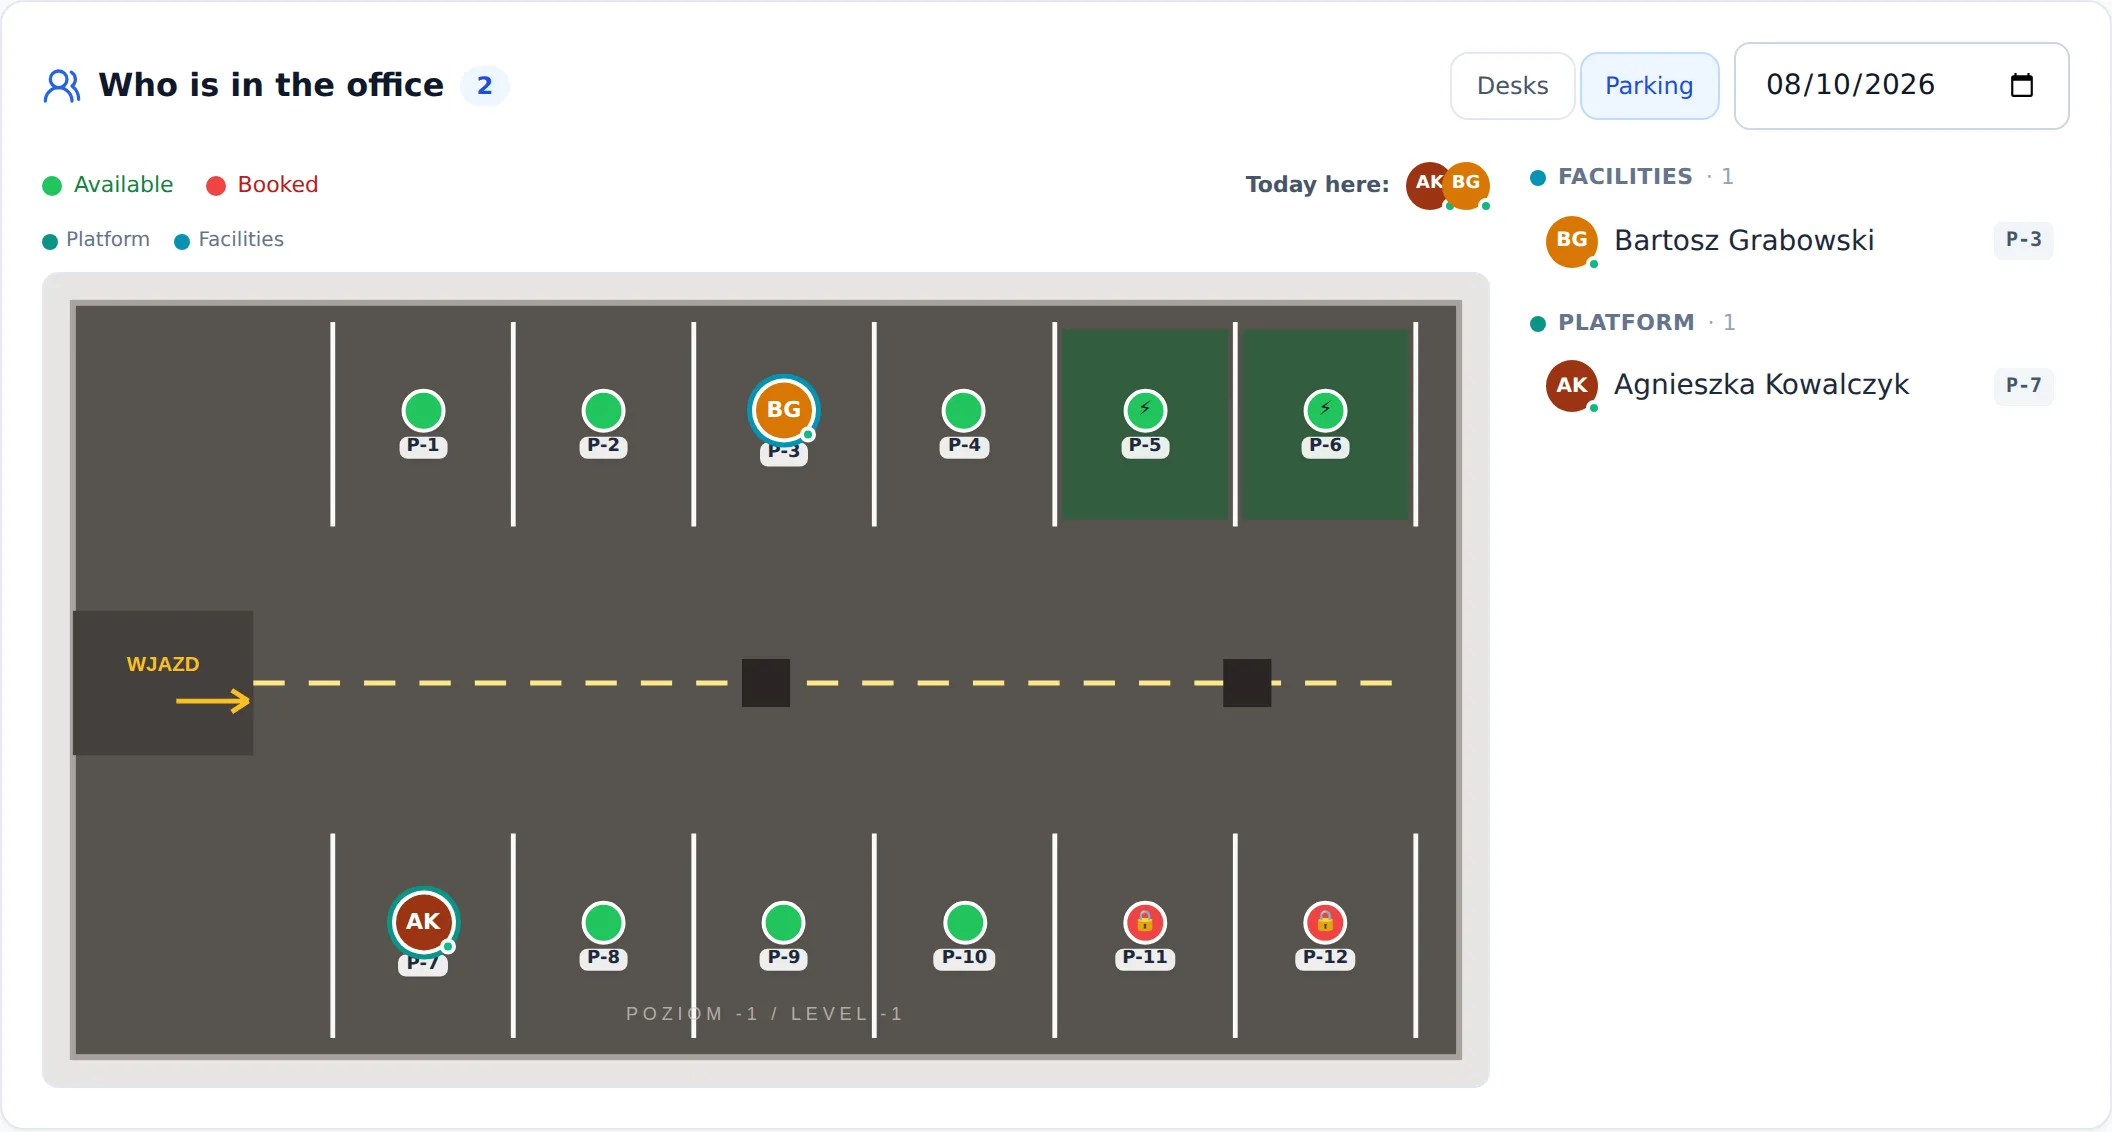
Same privacy rules as the booking map
Booking a meeting room
If your office has meeting rooms, they appear on the map too. Pick one and book it for a chosen time slot — the same click-to-book flow as a desk, and the room shows up in your reservations.
You can also book a room without opening the app first — scan the QR sticker by the door.
- 1
Scan the sticker
Point the camera at the QR code on the door. You do not have to be on any particular screen.
- 2
Room free — you are in
The room is booked for the next half-hour slot and you are checked in straight away. One move, no extra confirmation.
- 3
Room busy — you get the next slot
The screen says until when it is taken and offers the first free slot, for example "Book 12:00–12:30". Nothing is booked until you tap it.
Slots start on the hour or half hour
See who has the room today
Check-in — confirming arrival
A booking is only half of it. To take the space, you must check in within a time window. This way unused spaces return to the pool and nobody "blocks" a desk just in case.
- 1
Open "Check-in"
From the left menu, open
Check-in— you'll see your reservations for today. - 2
Check in
Click
Check Innext to the reservation, or scan the QR code on the desk / space. - 3
Done
The status changes to
Checked In. The space is yours.
No check-in = losing your space
Meeting rooms need no check-in
Too early?
Your reservations
You'll find all your reservations in the reservations view. You can check the details (space, floor, hours) and cancel the ones you won't use — a cancelled space returns to the pool right away.
Add a note to a booking
Emails and notifications you get
A booking confirmation tells you not only what you booked, but where it is — for example "HQ Berlin · Floor 3 · D-301" — with a Show on map button that opens the plan with your space highlighted. A calendar invitation is attached, so the booking lands in Outlook or Google Calendar with one click.
One email, not three
If you use the mobile app, the same messages can also reach you as push notifications on your phone — including when the app is closed. Allow notifications when the app asks after your first sign-in; you can switch individual categories on and off at any time in Settings → Notifications, where you also see the list of your registered devices. Signing out stops push on that device.
Several seats and guest bookings
The Executive Assistant uses the app exactly like an employee — the same menu, map and check-in — with two differences: no limit of one desk and one parking spot per day, and seats can be booked for guests from outside the company. Administrators can do both too, so they can stand in when the assistant is away. Available on every plan.
Several desks on one day
Book a second or a tenth desk or parking spot for the same day the usual way — each one is held under your own name. My day shows each of them as its own tile with its own check-in, so an ordinary booking still has to be checked into or it is released as a no-show. For people from outside the company use guest mode instead.
Booking seats for guests
- 1
Switch to guest mode
In the reservations view pick
For guestsin the header, or use theBook for gueststile on the dashboard. A violet banner confirms the mode. Booking for guests needs a computer screen; on a phone you can see and cancel the groups. - 2
Pick the seats
Choose desks, parking or rooms, the date and the hours, then tick any number of free seats on the map or the list — up to 100 in one request.
- 3
Book them in one go
One confirmation books them all as one group. If someone took a seat in the meantime, the rest are still booked and the dialog lists what was not, with the reason.
- 4
Cancel the whole group
Guest mode lists your groups with the date, hours and seats.
Cancel groupreleases every seat of the group still held, in one click — useful when the meeting moves.
Guests are never named
No check-in, no e-mails
Permanent spaces and reports
As a Board Member you have an assigned permanent space — a desk, a parking spot, or both. Some meeting rooms may be reserved for the Board only. On top of the everyday employee features you can release your space for a day and review Board Reports.
You never check in
A permanent space is not booked and cannot be lost to a no-show — it is yours whether or not you come in. So the My day screen shows you something else: your spaces with today's state, and one button for the day you are away. Bookings that a check-in does protect — a hot desk you took after releasing your own — are still listed there with their button.
The dashboard knows too
Releasing your space for a given day
If you are not coming in today, open My day and press "I'm away today". Pick which spaces to hand over if you have both a desk and parking, and confirm. Colleagues can use them today only — your permanent assignment does not change.
- 1
Open "My Releases"
In the Board section you'll find your permanent space (
My Releases). - 2
Pick a day and release
Choose a date and confirm the release. The space becomes available to others. With both a desk and a parking spot, pick which one you are handing over.
- 3
Come back whenever you want
You can undo the release as long as no one has taken the space for that day. The history shows exactly that: waiting, taken by a named colleague, or expired unused.
Scanning your own space
If you scan the QR sticker on your own desk or parking spot, the app recognises that the space is yours and says so: it is yours all day, nothing to check into. If you released it for today and nobody has taken it, the same scan offers "Take it back" — one tap and the day is yours again. If a colleague already took it, you will see that, with the nearest free desks.
Board Reports
In Board Reports you'll see an executive summary: office and parking utilization, the number of active Board Members, the ghost bookings ratio, plus the trend over time and the impact of space releases.
Plan usage at a glance
Guest seats are counted, not named
Managers see their own teams
Only your organization
Office configuration
The administrator sets up the office: adds locations and floors, uploads maps, places spaces and looks after settings.
Maps and placing spaces
- 1
Add a location and floors
In settings, create a location and, within it, floors or parking zones.
- 2
Upload a plan
Upload a floor or parking plan — we support SVG, PNG, JPEG and WebP.
- 3
Turn on add mode
In the map editor, click
Add deskorAdd parking. - 4
Click on the map
Each click creates a new space (auto-code
D-N/P-N) and drops a pin.
You don't need to create anything first
QR stickers
Every pin on a map has its own QR code. Employees scan it to check in, to take a free desk, or to book a room by the door.
- 1
Print the whole set for a location
One document with stickers for every desk, room and parking space at the location — across all floors and parking maps, not one floor at a time.
- 2
Stick them on
The code on the sticker matches the space code on the map, so you can check placement without scanning anything.
- 3
Confirm they are printed
Marking the location as printed clears the "needs reprint" flag.
Rotating codes invalidates the old stickers immediately
The "needs reprint" flag
Managing spaces
In the space list you can change the code, name and booking policy, and deactivate spaces you don't need. Three policies: HOT (anyone can book), PERMANENT (permanent space), BLOCKED (excluded from booking).
System configuration
In System Config you set operating parameters, including the check-in window (60 min before and 60 min after the start by default) and the maximum booking horizon in advance.
Reports and analytics
In Board Reports you'll see real office utilization: average desk and parking utilization, peak days, the ghost bookings ratio, demand for EV chargers and AI recommendations — with breakdowns by department and team. The data grows as the app is used.
Users and roles
In User Management you add people, set their role (employee, Executive Assistant, Board Member, Manager on the Enterprise plan, administrator) and assign a department and team — the same grouping Board Reports can break down by. New users get an e-mail invite and activate the account themselves.
Import many users from CSV
Plans and limits
In Organization → the Plan usage card shows live counts against your plan's ceilings: objects (desks, parking and meeting rooms), users and locations. Bars turn amber near a limit and red once you reach it.
Four plans scale with your team — Start, Standard, Pro and Enterprise. You can compare them on the pricing page.
Reached a limit?
Backups
Every organization is protected by nightly encrypted backups of its data and uploaded maps. Admins can review the schedule and backup status under Organization settings. Copies follow a daily → weekly → monthly → quarterly → yearly schedule; restoring an earlier state is done together with support.
Restores are reversible
Subscription and payments
You manage the subscription in Organization — that is where you change the plan and open the secure Stripe payment portal to update the card or download invoices. If a payment fails, nothing stops working right away: the organization keeps 30 days of full access to settle the payment. Once it goes through, everything simply carries on.
What happens after the 30 days
Meeting-room kiosks
A tablet mounted beside a meeting room, showing that room's day and taking check-ins. Nobody signs in to it: the device is paired once to one room and authenticates as itself from then on.
- 1
Open the kiosk list
Administration →
Kiosksshows every meeting room and the state of its tablet. A room with no device is the row worth acting on. The same action is available from a floor's space list. - 2
Generate a pairing code
Click
Generate pairing codeon the room's row. Six digits appear — keep the screen open, they cannot be read again. - 3
Type it on the tablet
In the tablet’s browser open
www.deskandpark.com/kiosk— the same address you use for the portal, with /kiosk at the end — and enter the code on the keypad. - 4
That's it
The tablet starts showing the room's day and refreshes itself. To retire a device, use Unpair tablet on its row — it stops working on its next request, and the action lands in the audit log.
The code is one-time and short-lived
A kiosk cannot book — on purpose
Key terms
- Hot desk
- A space anyone can book — available on demand for a chosen day.
- Permanent space
- Assigned to a specific person (a Board Member). Free for others only after it is released.
- Check-in window
- The window when you can check in: from an hour before to an hour after the reservation start.
- No-show / auto-release
- No check-in within the window → the reservation is released automatically and the space returns to the pool.
- Ghost booking
- A reservation that was never used (no check-in). Board Reports count these.
- Guest seat
- A desk, parking spot or room booked by the Executive Assistant or an administrator for someone from outside the company. Shown as taken, never named, no check-in; counted separately in reports.
- Per-tenant isolation
- Each company's bookings, users and maps live in its own database, not in tables shared with other customers.
- Meeting room
- A bookable room placed on the map. Booked for a time slot, and it counts toward your plan's object limit like a desk or a parking bay.
- Plan & limits
- Your subscription tier (Start, Standard, Pro, Enterprise) sets how many spaces, users and locations the organization can have.
- Department / team
- Optional grouping for users. Board Reports can be broken down by department and team.
- Backup
- A nightly encrypted copy of the data. Restoring an earlier state is reversible and done together with support.
Frequently asked questions
I can't check in+
Check the time. Check-in only works within the window: from 60 min before to 60 min after the reservation start. Outside it you'll see a "too early" or "the window has closed" message.
My reservation disappeared+
If you didn't check in within the window, the reservation was released automatically (no-show) and the space returned to the pool. Book again and remember to check in.
The "Add desk / Add parking" buttons are disabled+
These are admin features in the map editor. First upload a floor or parking plan — then you add spaces by clicking on the map.
Reports show little data+
That's normal at first — metrics are computed from real reservations and check-ins, so they grow as the app is used.
I'm a Board Member — how do I give up my space when I'm away?+
In the Board section, release your space for a chosen day. It goes to the pool of free spaces; you can undo the release until someone takes it.
I can't add another desk or user+
You've probably reached your plan's limit. Open Organization → Plan usage to see how much is left, then upgrade the plan or free up room by deactivating unused spaces or users.
How do I add many users at once?+
In User Management use Import CSV: download the template, fill in the rows and upload it. Imported users activate with a one-time e-mail code — you don't hand out passwords.
What happens if we miss a payment?+
Nothing dramatic at first. You have 30 days of full access to settle the payment (Organization → Stripe payment portal). Only after that is the organization paused — employees cannot sign in, but the administrator still can, straight to a billing page. Settling the payment restores access automatically and no data is lost; data is permanently deleted only 30 days after the pause.
Can I book a desk for a visitor from outside the company?+
Yes, if you are the Executive Assistant or an administrator: switch the reservations view to guest mode, pick the seats and book them as one group. Guest seats are anonymous and need no check-in. Other employees cannot book for guests — ask your assistant or administrator.
Who is the Executive Assistant role for?+
For the person who books for others — seats for a board meeting or a general meeting of investors, say. It works like the employee role, without the one-desk and one-parking-spot-a-day limit, and adds booking for guests. The administrator assigns it in User Management or through the CSV import; it is available on every plan.
Need help?
www.pixelofsoftware.com.