
Set up your workspace yourself — in about an hour
Six steps from creating the company account to the first desk your team books. No IT project, no installation, no onboarding call required — every screen below is the real product.
- Time needed
- 60–90 minutes for one office
- Who does it
- One admin — no technical skills
- What to prepare
- Work e-mail, invoice details, a floor plan file, your employee list
What you are going to build
The order is not accidental: each step unlocks the next one, and the app keeps reminding you what is still missing.
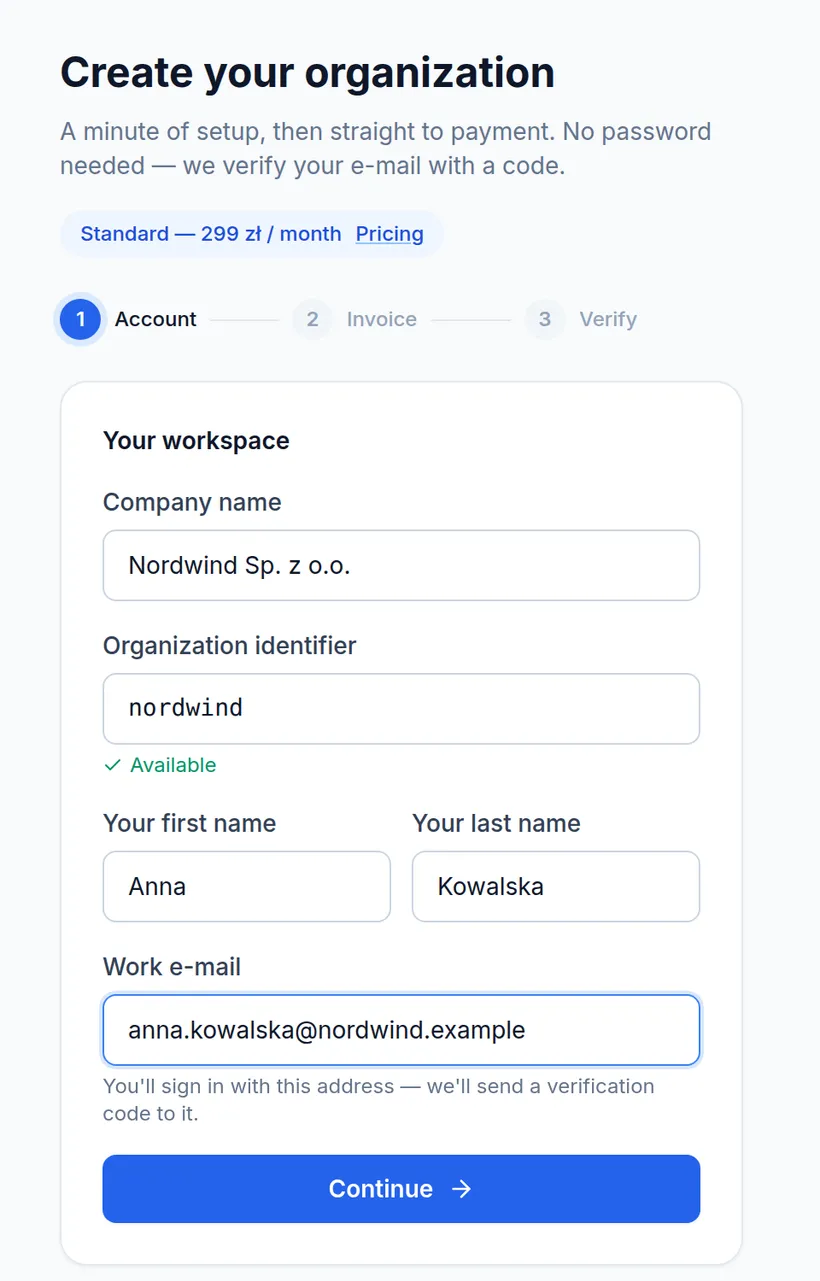
Create the company account
The organization identifier you pick here is typed by every employee at every sign-in, and the e-mail becomes the first admin account plus the invoice address. Two minutes of attention now save a migration later.
- A three-step wizard: Account → Invoice → Verify, with a progress bar you can walk back through.
- The identifier is checked while you type: 3–63 characters, a–z, digits and hyphens; taken and reserved names are refused on the spot.
- We verify the mailbox with a 6-digit code instead of a captcha — valid for 10 minutes, five attempts, resend available.
- EU companies enter a VAT ID; the address you type is the one printed on the invoice.
Pick a plan and pay
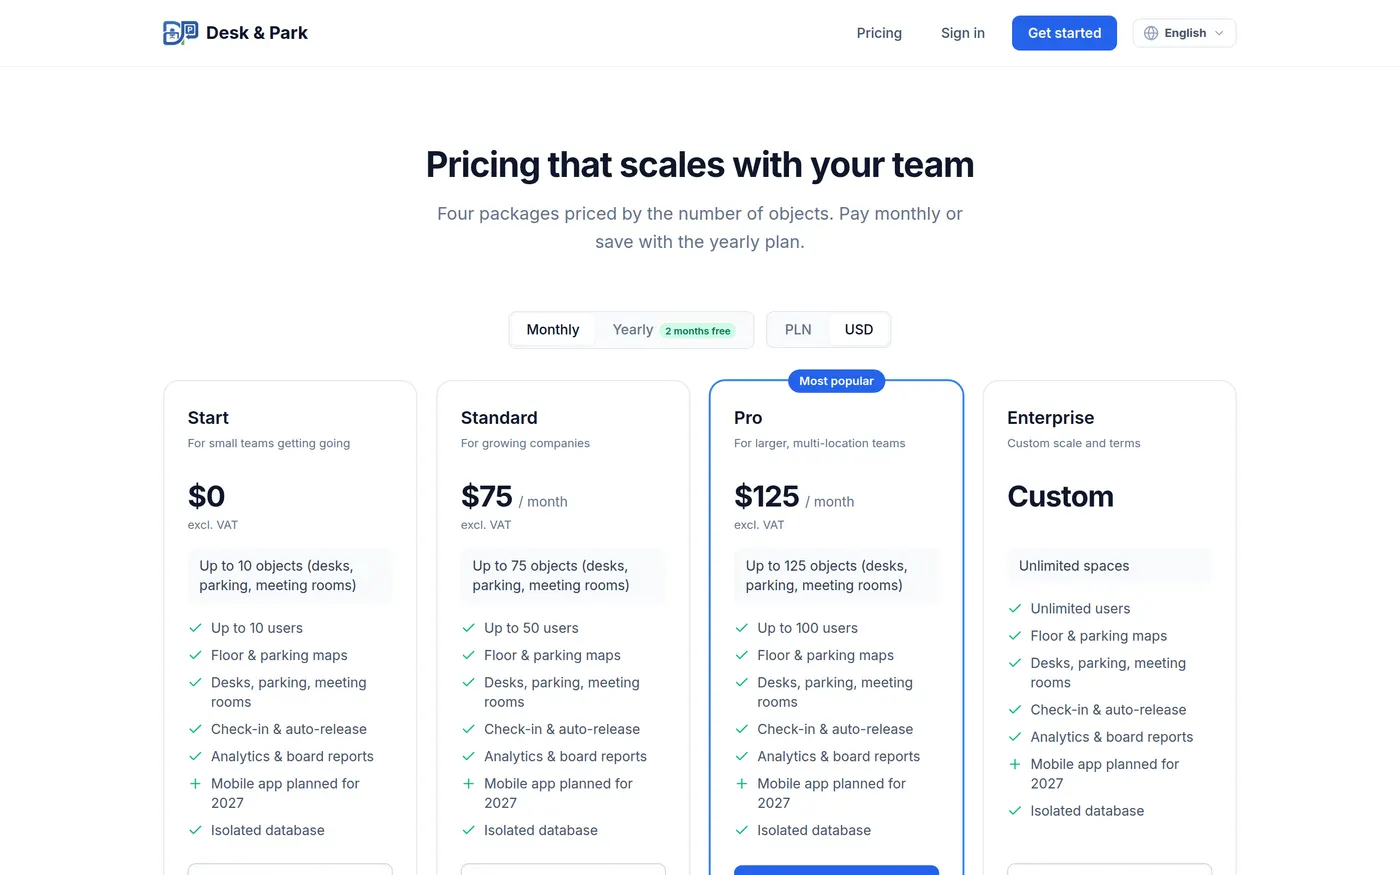
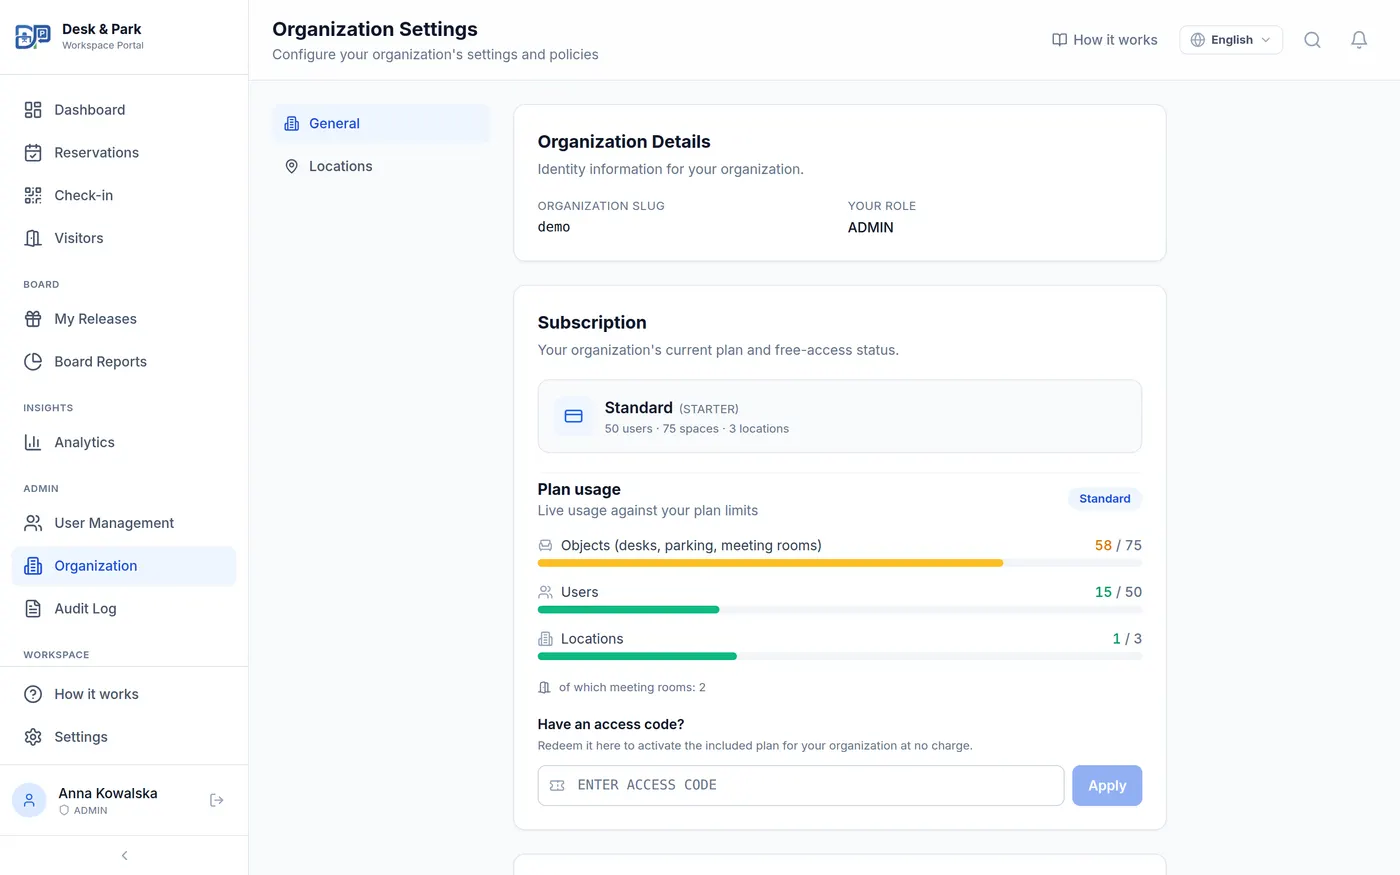
A plan sets two hard limits: how many people and how many spaces. They are enforced in practice — a bulk import that would cross the user ceiling is refused whole — so choosing the right size is what keeps the rollout from stalling halfway through your staff list.
- Count spaces, not people: desks plus parking spots plus meeting rooms is the number a plan is measured against.
- Payment runs in a hosted Stripe checkout — we never see your card. The free Start tier does not ask for one at all.
- Prices are net; VAT is added automatically from the country and tax id you entered. Yearly billing costs ten months.
- Afterwards everything lives under Organization → Subscription: plan and limits, the billing portal, and every invoice as a PDF.
An unpaid invoice never locks you out of billing
If a payment fails, admins keep a billing-only screen with the same “Manage subscription” button — you fix it yourself, without contacting us.
Upload the office and parking plans
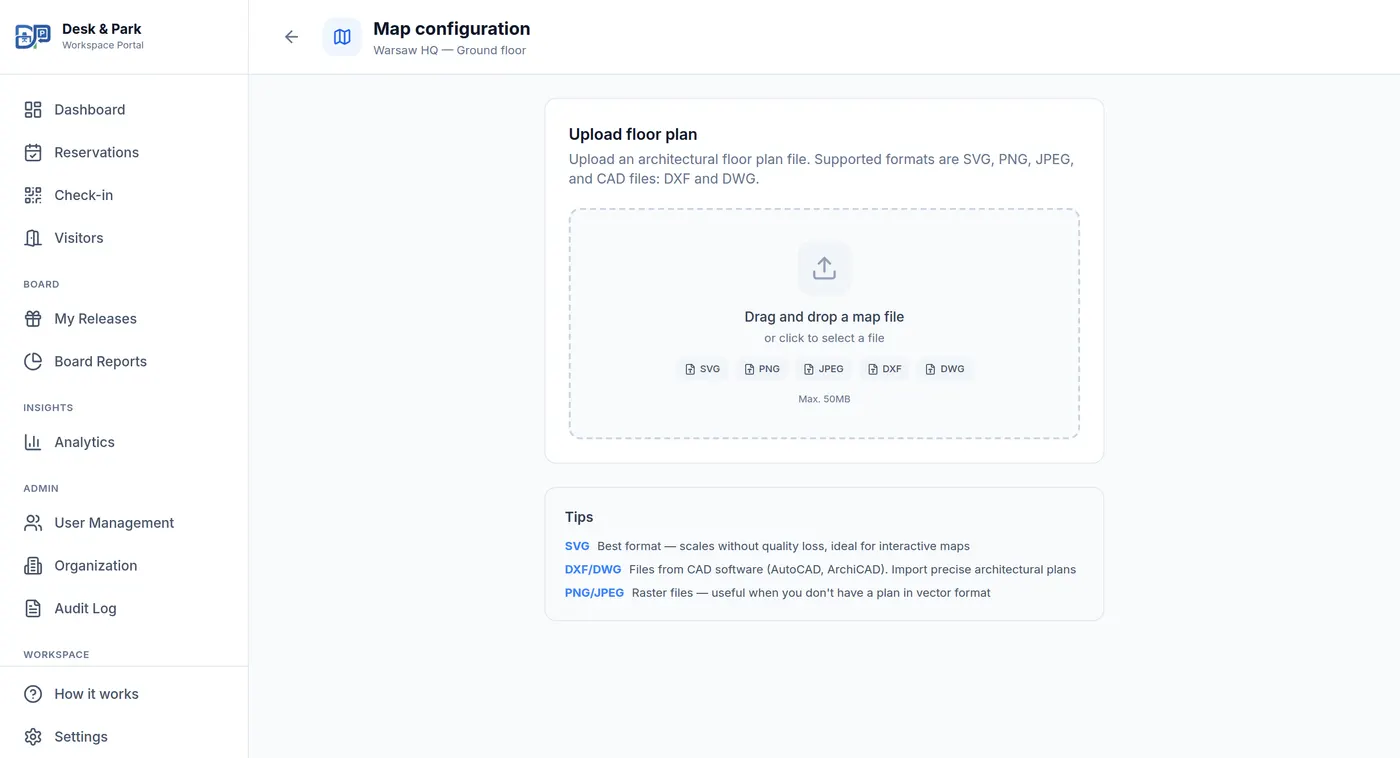
The map is the heart of the product. Nobody picks “desk 47” from a list — people look at the plan and take the one by the window, next to their team. Without a plan the system still works, but it looks like a spreadsheet.
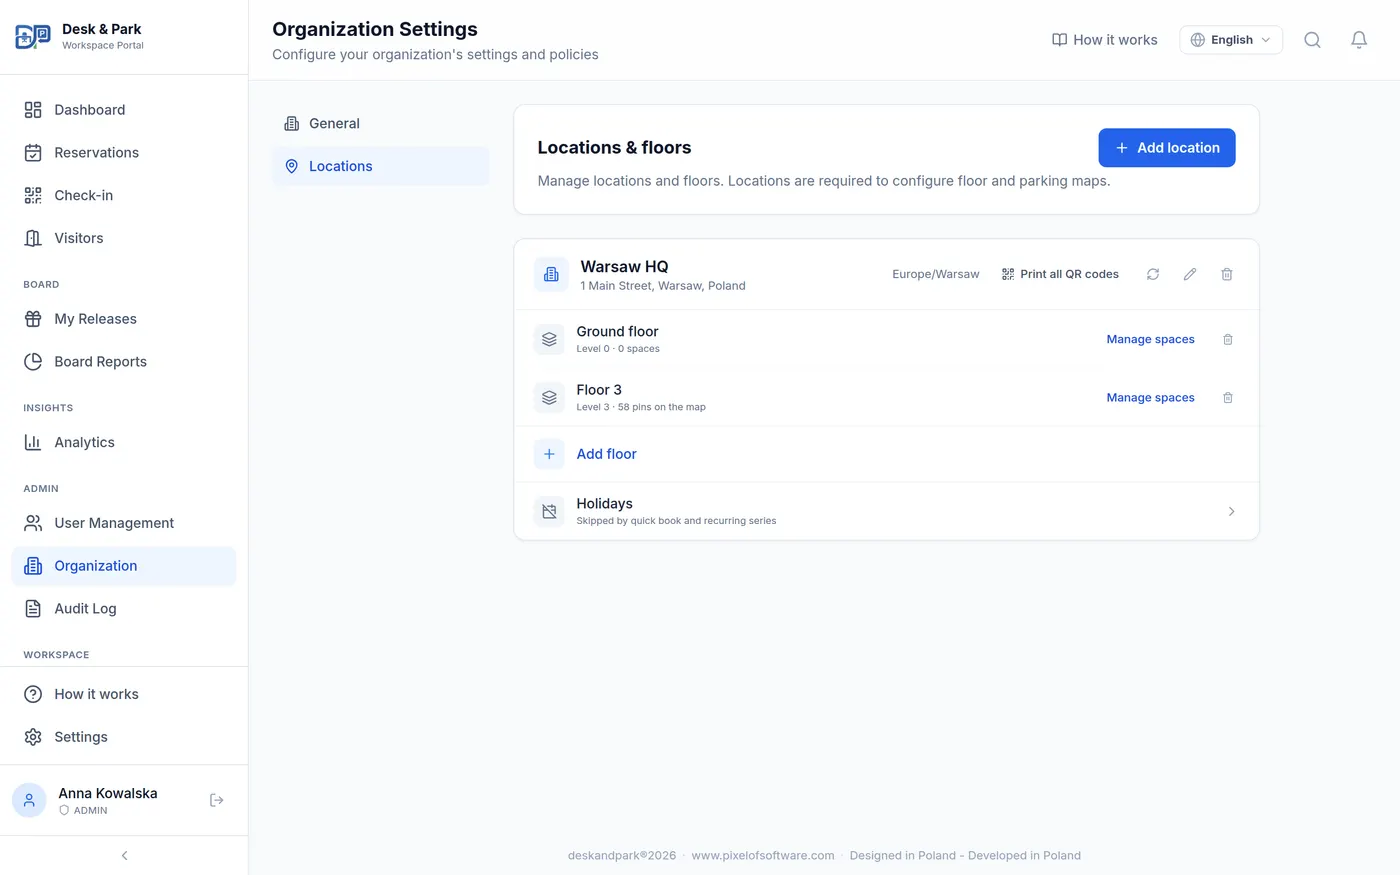
- First a location (one building), then floors inside it. The timezone belongs to the office, so a colleague working remotely sees the same room schedule as everyone on site.
- Supported formats: SVG (best), PNG, JPEG and WebP. Up to 50 MB. A CAD file from the architect (DXF/DWG) needs exporting to SVG or PNG first — we do not read CAD.
- The plan does not have to be perfect — a scan or a readable photo of the evacuation plan is enough to get started.
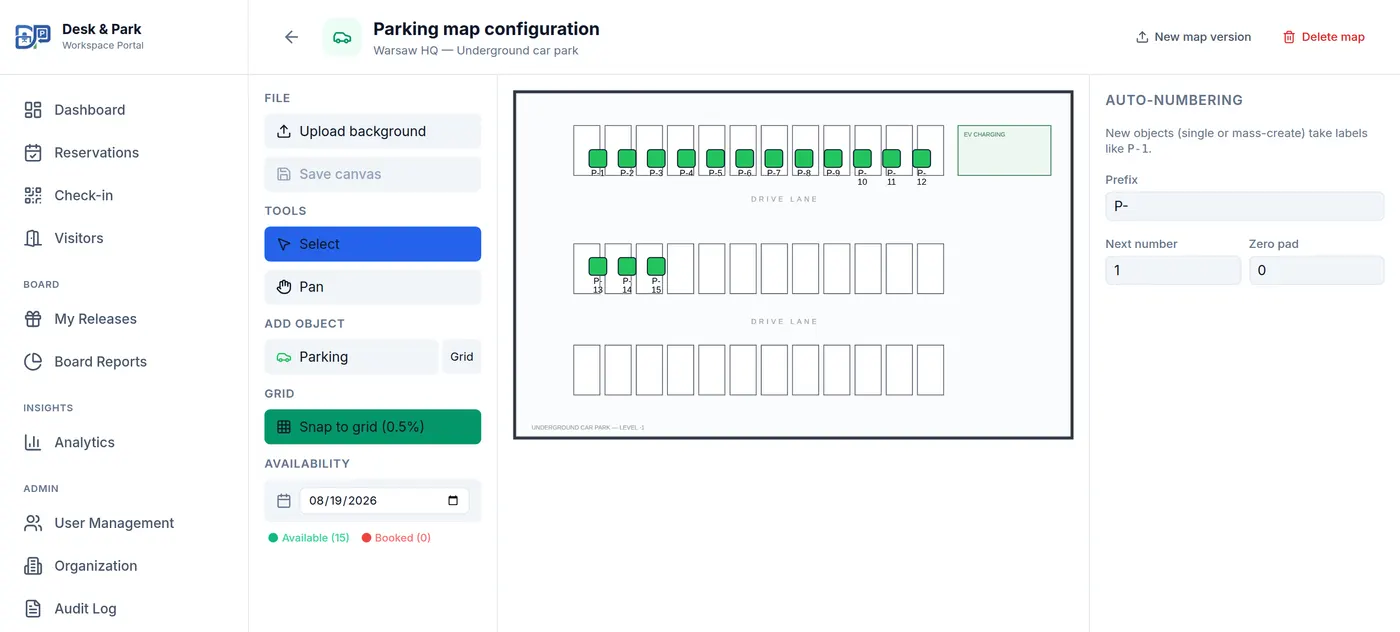
- Parking lives under the location rather than a floor: you create parking areas (“Underground car park”) and upload their layouts separately.
Place desks, rooms and parking — and print the QR codes
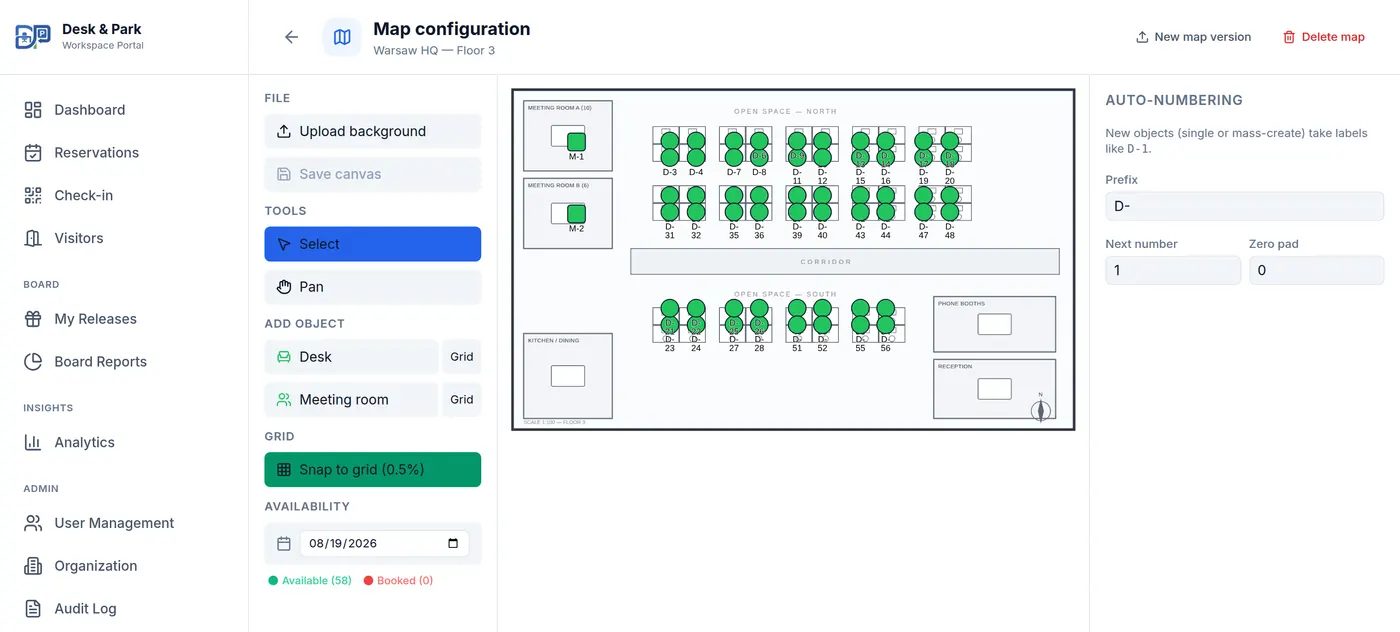
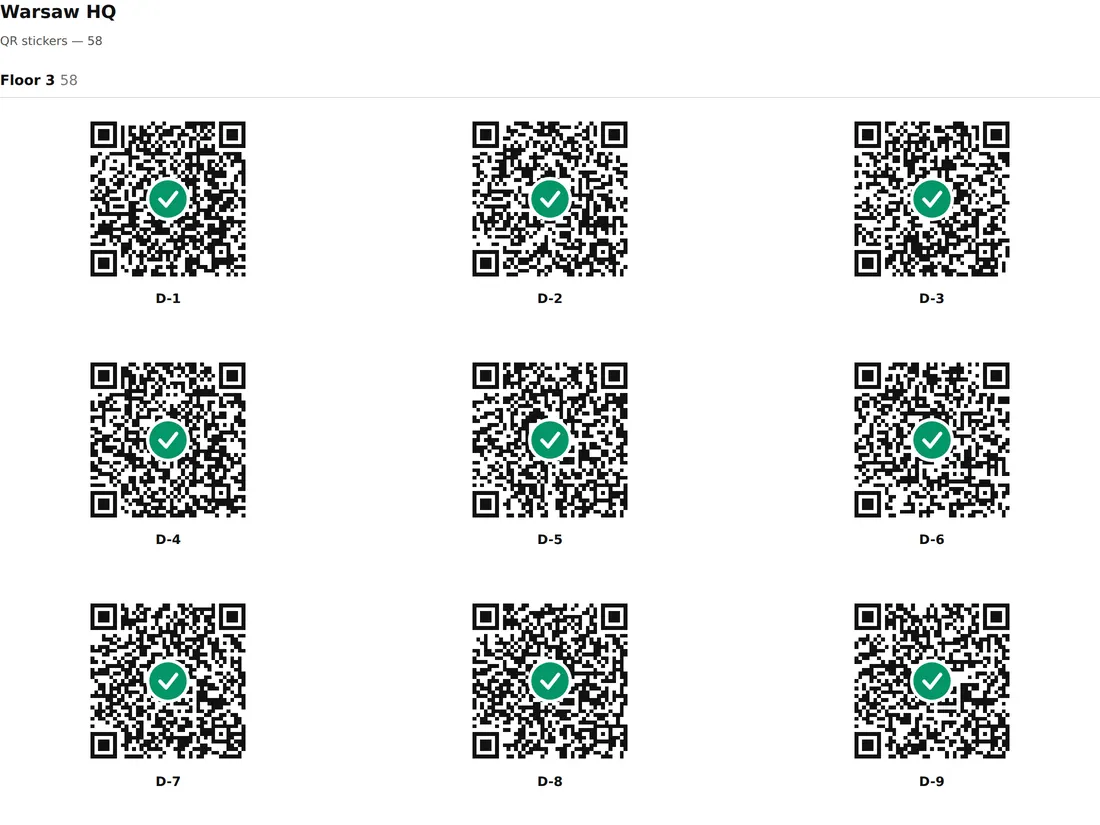
This is where the system starts working for real. Every object you stamp onto the plan becomes a bookable space and gets its own QR code, so an employee checks in on the spot with a single scan.
- Pick Desk, Meeting room or Parking and click on the plan. Labels (D-1, M-1, P-1) are assigned automatically; snapping keeps the pins tidy.
- Save the canvas — that is the moment the server issues the QR tokens for the new spaces.
- Print one sheet for the whole location: every desk, room and parking bay across all floors and parking maps, each sticker labelled with its space code.
- A scan does the obvious thing: a free desk is booked and checked into at once, a free room takes the next half-hour slot, a busy room shows when it frees up.
Replacing QR codes instantly kills every sticker already printed
Refreshing the codes for a location is the right move if stickers leaked outside the building — but from that second the old stickers are dead until the new set replaces them. Plan the rotation together with the reprint, never before it.
Bring your people in
Up to now you built the system for yourself; this step hands it to everyone else. Department and team fields pay off later — they colour the office map and group the daily roster.
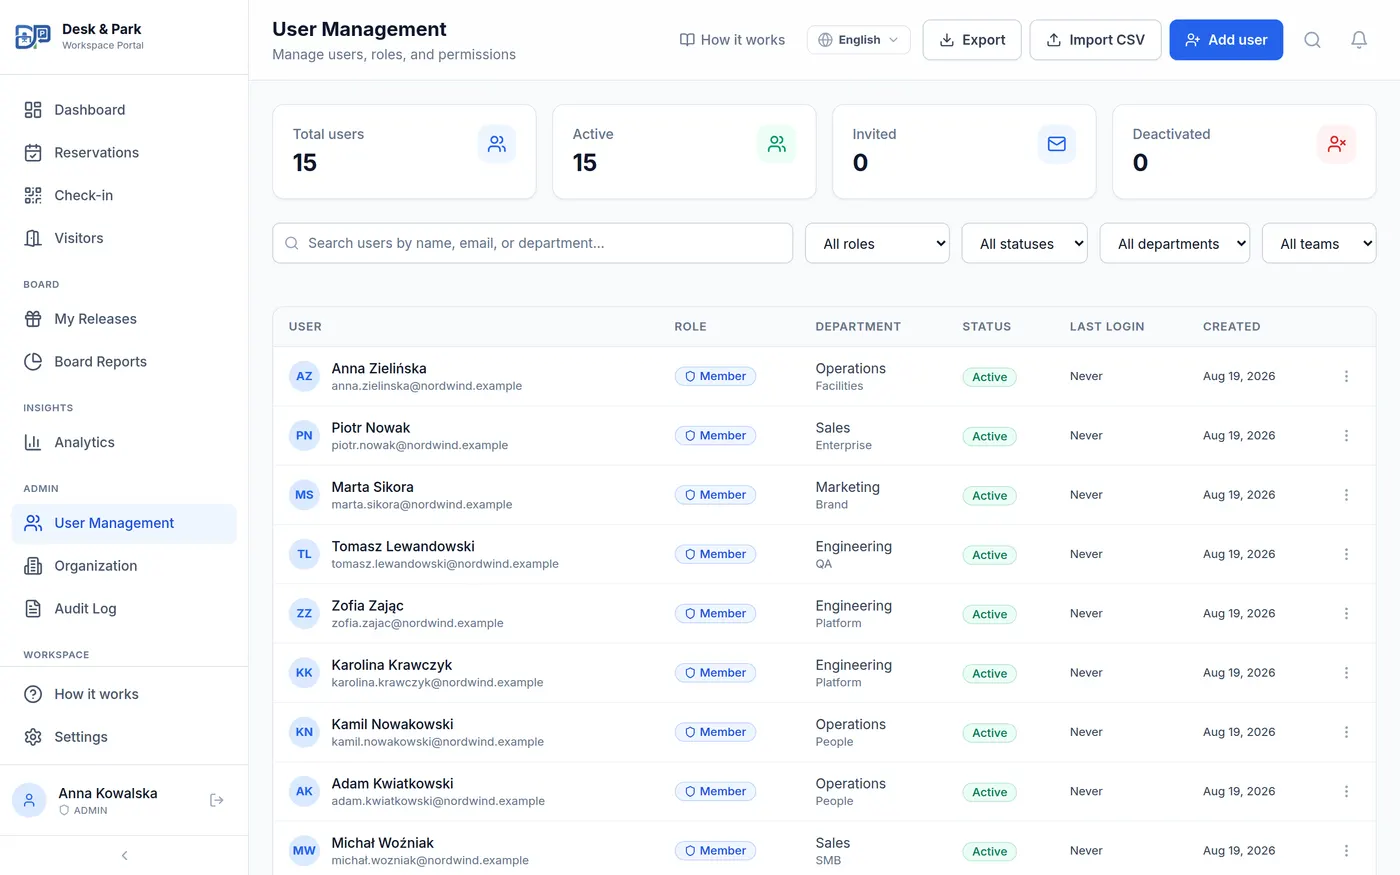
- Add people one by one with a role — Employee, Board Member, Executive Assistant, Manager (Enterprise plan) or Administrator — plus optional department and team.
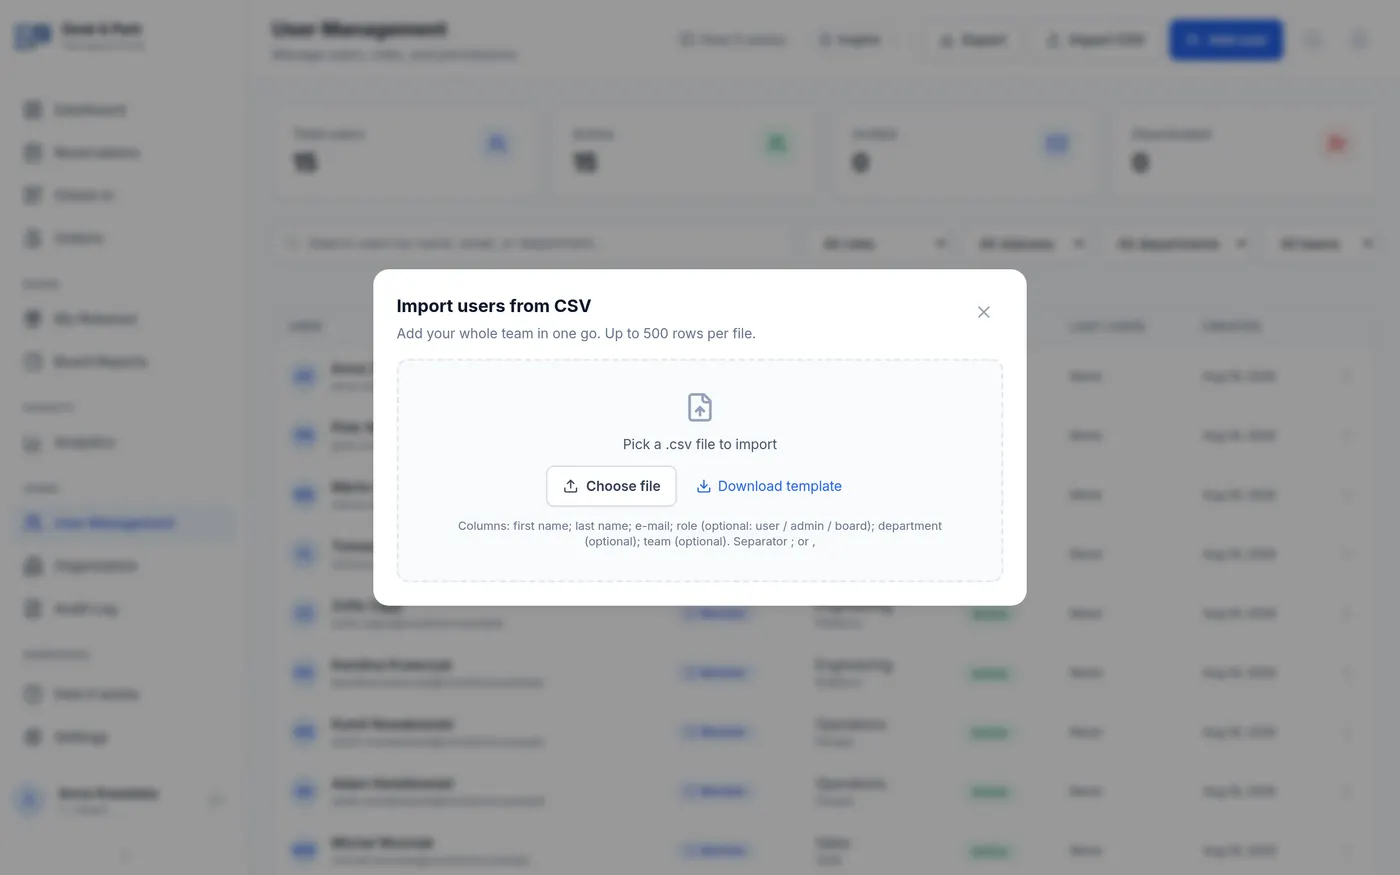
- Or import the whole team from a CSV: up to 500 rows, semicolon or comma, Polish and English column names and role labels accepted.
- The preview shows what will be created; the result reports created, skipped and invalid rows with a reason for each.
- Imported accounts are active immediately and receive no invitation e-mail — you tell the team the system is live.
- Give the executive assistant role to whoever books for others. It lifts the one-desk and one-parking-spot-a-day limit for that person and unlocks booking anonymous seats for guests from outside the company — on every plan. Admins can do the same when the assistant is away.
First sign-in: a code, then a password of their own
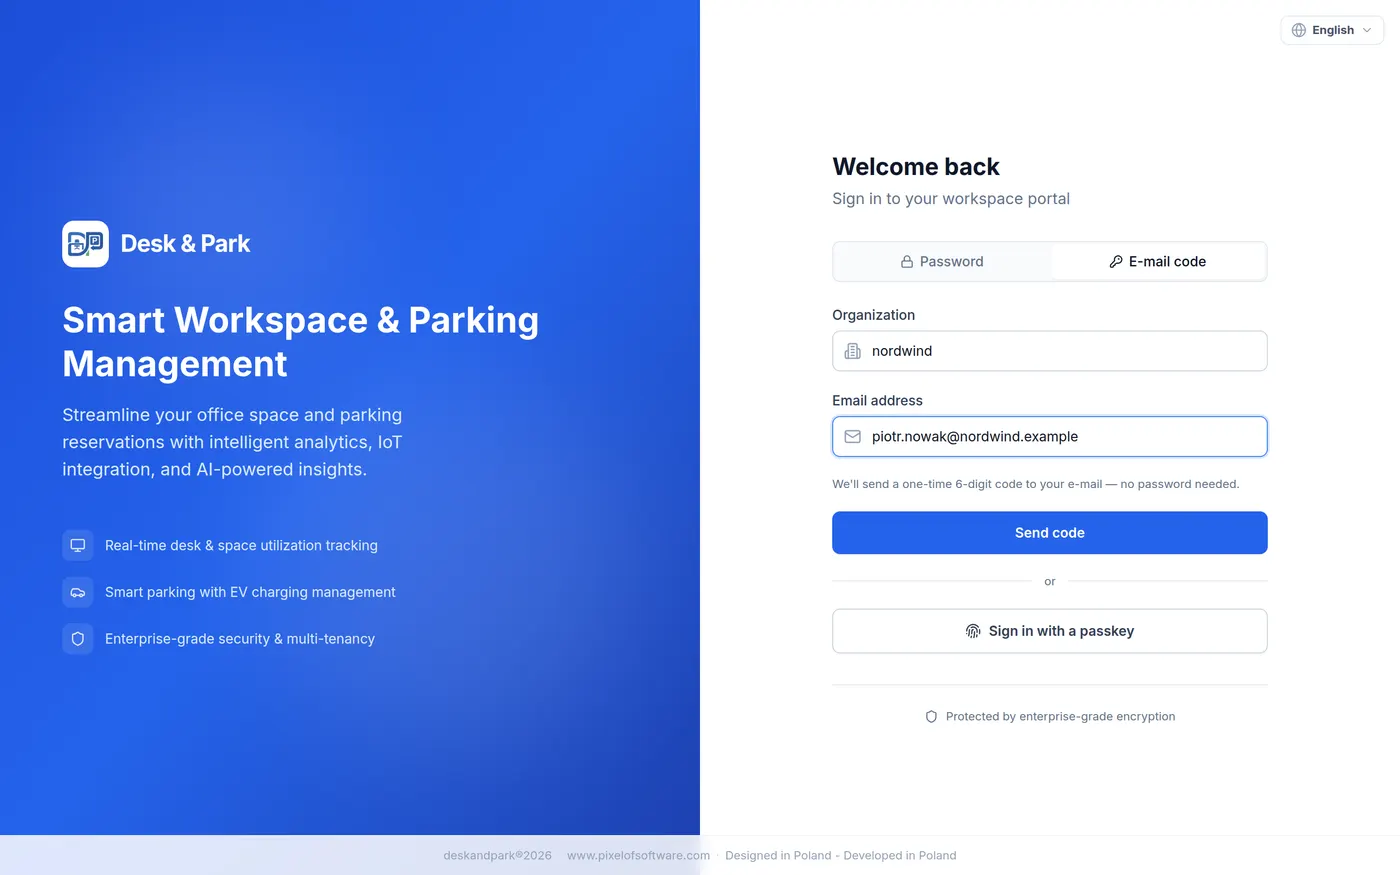
Desk & Park is passwordless by design — there is no starting password to hand around on chat. Give your team these five lines:
- 1Open the portal and pick the “E-mail code” tab on the sign-in screen.
- 2Type the organization identifier and your work e-mail, then send the code.
- 3Copy the 6-digit code from your inbox — it is valid for 10 minutes — and sign in.
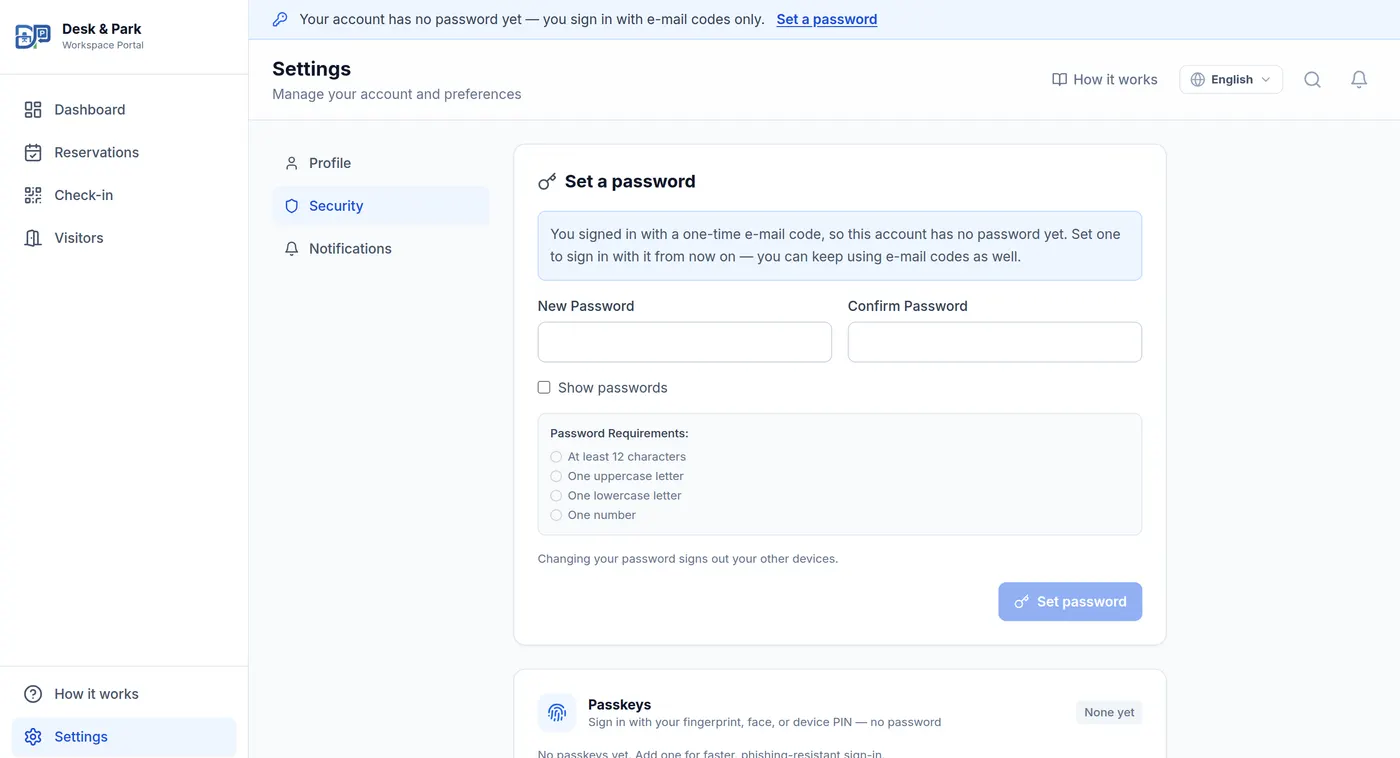
- 4In Settings → Security set a password: 12 to 256 characters with an upper-case letter, a lower-case letter, a digit and a special character.
- 5Optionally add a passkey and sign in with Face ID, a fingerprint or Windows Hello from then on.
Nobody is stuck without their mailbox
An admin can set a password for a user directly, or send them a reset link — both from the user’s row in user management.
Check it with your own eyes, then go live
The configuration is done, but a rollout only ends when people actually use it. Five minutes of checking now decides whether desks get booked in the app or on the group chat.
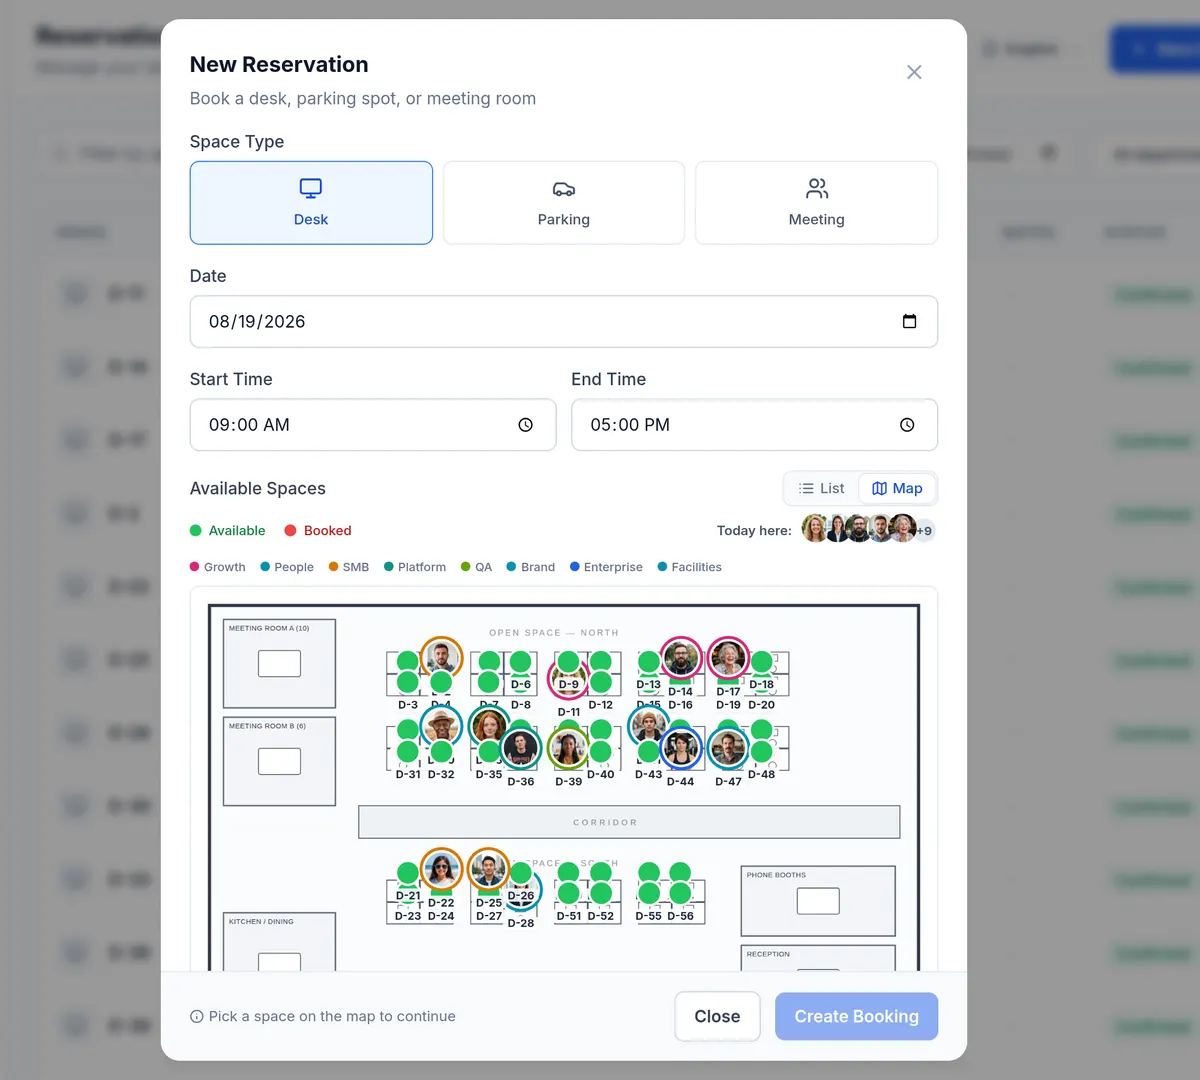
- Open a new booking, switch the space picker from list to map — that is exactly what an employee sees.
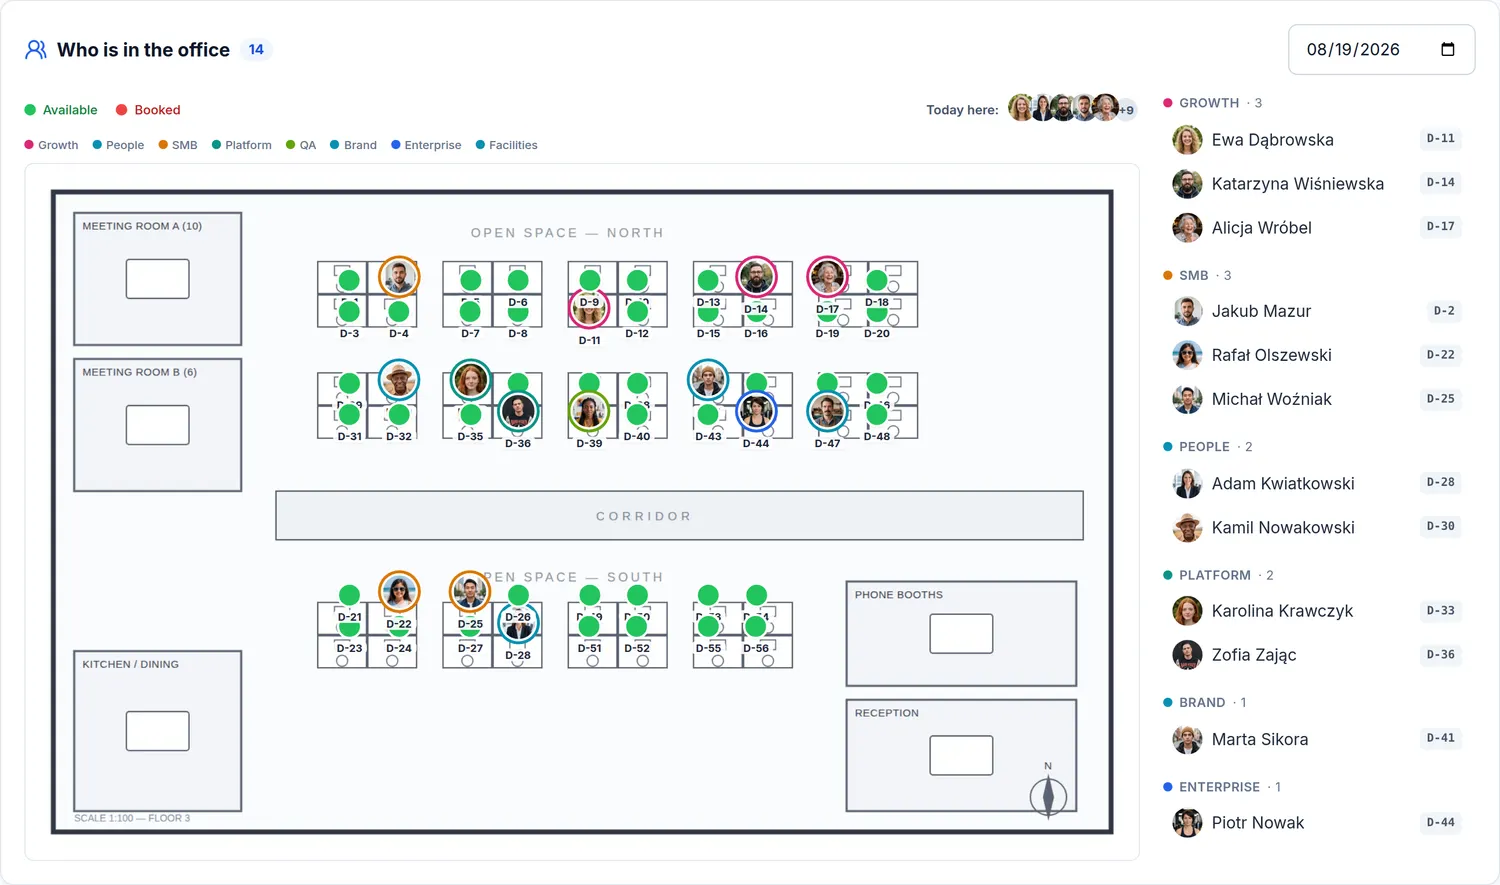
- The dashboard answers the question people actually ask: who is in the office today, and where do they sit.
- Add holidays, further floors and parking areas, tablets for the meeting rooms, then calendar, SSO and SCIM when you need them.
- Point your team at the built-in “How it works” guide instead of writing your own instructions.
SSO is for your team — admins keep their own sign-in
Once single sign-on is switched on, employees can use it, but administrator accounts are refused there by design. Admins sign in with a password, an e-mail code or a passkey — so make sure every admin turns on two-factor authentication in their own Settings → Security, starting with you.
Rollout checklist
- Company account created, e-mail verified
- Plan chosen, payment method attached, invoice downloaded
- Location with the right timezone, working days and holidays
- Floors and parking areas created, plans uploaded
- Desks, rooms and bays placed — and the canvas saved
- QR stickers printed, stuck on, and the print confirmed
- People invited or imported, a second admin appointed
- A test booking made from the map
- The team told how to sign in
- Executive assistant role given to whoever books for guests
Stuck somewhere?
The in-app guide covers every screen, and support answers admins directly — you also have the tools to solve most employee questions yourself: reset a password, resend an invitation, cancel a booking, reprint a sticker.
Read the in-app guide →Ready? The first step takes two minutes
Create the organization, and follow this page screen by screen.
Create your organization